Wednesday, April 16, 2014

Chocolate Chip Cookies--Gluten Free& Vegan

DONT GET SCARED OR FLIP TO THE NEXT PAGE. I SWEAR THESE DARN THINGS ARE AHHHHH-MAZING!!!! 

I've never been the kind of person to eat vegan or gluten free. I do like to eat healthy, and always look for healthier options with less sugar, sodium and more veggies but recent events have forced me to make a change. I was diagnosed with an autoimmune disease a month ago that really scared me; I had to go on a bunch of medication and change my diet. I am now making the change to being gluten free (but not vegan just yet). Being gluten free as a college student is very difficult-- the cafeterias do have gluten free bread and pasta however, thats all. I can't live off of bread and pasta, especially if those carbs aren't paired with yummy veggies, cheese or protein of some kind! 

I made these cookies at home, a couple days before Easter. This recipe was completely made up, lets just say I "winged it" and boy did I hit a home run. These cookies are the best Ive ever made and I didn't use milk, eggs or sugar! The best part is that if I didn't tell you the change in ingredients, you would have never guessed how healthy they are! 

Give them a try. They satisfy the sweet tooth without making you feel guilty!
Yield: 18 coookies
Ingredients: 
1 1/2 cups of gluten free flour
1 cup of oats 
1/4 cup sliced almonds
1/4 cup chopped pecans 
1/4 cup roasted peanuts 
1/4 cup roasted edamame 
1/2 cup of regular almond milk
1/2 cup of dark chocolate almond milk
1/4 tsp nutmeg
1 tsp cinnamon
1 tsp baking soda
1/4 cup of agave nectar
2 Tbs olive oil
1 cup of chocolate chips
2 Tbs coconut oil

1. Preheat oven for 355 degrees.
2. Make edamame and peanut paste for protein. Put edamame in a bowl and pour hot water over them just to take off the skin if they have skin. In a blender combine edamame and peanuts and puree until it has a powder like consistency. Set aside.


3. In a mixing bowl, combine flour, oats, edamame paste, baking soda, cinnamon, nutmeg and salt.


4. Keep mixer on low and slowly pour in regular almond milk. Add olive oil, agave nectar and slowly pour in second half of chocolate almond milk. Melt coconut oil if solid and add to mixture. Add chips, and all nuts. Mix until combined.


5. Oil a baking sheet. Take dough and roll into golf sized balls. They won't grow much so you can place them close together on the baking sheet.

6. Bake for 20 minutes, let rest for 5 minutes.


Enjoy these cookies as a snack, or with coffee/ tea at breakfast! Please share and comment! :) 

XOXO- Babushka 


Sunday, December 29, 2013

Greek Style FIsh with Rice Balls


I love fish; my dad has been bringing home fresh catcher fish since I can remember. He would spend all weekend fishing in some forest way off in the nowhere, and come home with up to 40 fish! 

Having so much fish, Ive always been in charge of coming up with creative ways to cook, the fish; smoke it, shallow fry it, deep fry it, bake it. 
Being in love with Greek culture, this is my way of being creative and blending my passions together: various cultures and cooking. Hope you enjoy this one! 


Ingredients:

12-15 filets of fish

Fish Marinade:
1 cup of olive oil
1 Tbs Balsamic Vinegar
2 cloves of garlic
1 Tbs Basil pesto
1 tsp dried parsley
1 tsp dried oregano
1 tsp salt
1 tsp pepper

Rice Balls:
1 1/2 cups of brown rice
1 Tbs olive oil
2 cups of vegetable/chicken broth
1/4 cup of red wine
3 egg yolks
Salt and pepper to taste


Assembly:

Fish:
1. Mix all of the ingredients in a bowl. Transfer half of the mixture into one plastic bag and half into another.
2. Place half of the fish into one marinade and half in the other. Massage the fish in the plastic bag; this is to make sure that the marinade gets all over the fish. All to marinade for 4-8 hours.
3. Once marinade process is done. Heat the oven to 375 degrees. Place fish on a baking sheet drizzled with olive oil, and bake for 25-30 minutes.

Rice Balls:
1. Combine vegetable broth and wine in a medium pot. Bring to boil, add rice. Stir and bring back to boil, then reduce heat to a simmer. Allow rice to simmer for 10 minutes, stirring every 2 minutes. Once liquid is absorbed and rice is soft, add olive oil and take off heat. Incorporate egg yolks. When the rice mixture is cooled, roll rice into golf size balls (or larger). Put them on a oiled pan and bake at 350 for 20 minutes.
2. When they're finished, place the rice balls in a warm tomato sauce so that the rice absorbs delicious tomato flavors! 

Serve Greek style fish along side the rice balls covered in tomato sauce! 


The fish I used for this recipe is Perch… DELICIOUS! 

These rice balls aren't in tomato sauce; simply drop them in a saucepan with warm tomato sauce!

ENJOY! 


Friday, December 20, 2013

Rosemary Orange Chicken


My favorite colder, winter time meal is roasted chicken. Its the perfect hardy dinner that one needs after a snowy and bitter afternoon. The smell of apples, oranges and rosemary combined with crispy chicken is almost divine. For me, theres no better meal to cook for my family in December. 


Ingredients:
1 whole chicken
1large potato
1 medium apple
1/4 cup of celery
2 oranges
2 sprigs of fresh rosemary
1 basil leaf
2 Tbs salt
1 tsp pepper
1 tsp dried parley
3 Tbs olive oil

Assembly:
1. Preheat oven to 400 degrees

2. Make sure your chicken is thawed if it is frozen. Take the chicken and place on a clean cutting board (make sure you have an apron on and have washed your hands with soap and water). Drizzle olive oil all over the chicken and use your hands to massage it all over the chicken. Wash your hands again.

3. Sprinkle half of the salt, pepper, dried parsley and rosemary over the chicken, and massage it in. Wash your hands again.

4. In a large bowl, place the peeled and diced potato and apple. Cut the orange into fourths and then again each fourth in half. Add the celery and sprinkle in the rest of the salt, pepper, herbs and chopped basil. Take the other orange and squeeze all of the juice out over the mixture.

5. Transfer chicken into a roasting pan. Place half of the potato and apple mixture inside the cavity and half around the chicken.

6. Bake for 30-40 minutes, depending on how large the chicken is. You will know the chicken is done when the skin is brown and crispy and then the meat is fork tender. 

(Unfortunately I didnt take a  picture of this meal) 

You may choose to baste the chicken every 10 minutes or so with the drippings in the pan. This will help the chicken in absorbing the juices from the fruit and veggies, and get the skin crispy. 


STAY WARM! 


ENJOY! 

Saturday, October 12, 2013

Homemade Pumpkin Puree

Ever since I learned how easy it is to make your own pumpkin puree, I never buy the canned stuff! Fresh pumpkin puree, made by yourself tastes so much better in food than canned ever did! 


Ingredients:

1 pumpkin (size of your choice)
2 Tbs olive oil

Assembly:

1.) Preheat oven to 425 degrees F

2.) Thoroughly wash your pumpkin. With a sharp knife and sturdy cutting board, cut the pumpkin in half, and using a spoon, scoop all the seeds out from the inside. (If you want to make pumpkin seeds for a snack, save the seeds in a small bowl and bake them for 25 minutes with salt and pepper at 375 degrees!)

3.) Then depending on how big your pumpkin is, you'll need to cut each half in half or into fourths.

4.) Drizzle a baking sheet with olive oil and place the pumpkin pieces flesh side up.

5.) Bake the pumpkin for 45 minutes, or until fork tender. Sometimes a pumpkin will need to be baked more, especially if it is larger. If this is the case, just bake it until it is fork tender.

6.) Once pumpkin is cooked and cooled, place the pumpkin in a blender and blend until smooth.

7.) Transfer pumpkin puree into a large bowl. Use for anything from pumpkin soup, bread, smoothies, oatmeal and even pumpkin gnocchi! 

** This pumpkin puree will be a lighter shade of orange than canned pumpkin. This is because this pumpkin puree is fresh and have NO ADDED PRESERVATIVES! 

Have happy and healthy fall fun! 

<3 Babushka


Homemade Potato and Pear Gnocchi

We have a pear tree in my backyard. One morning I walked out and two pears dropped down right as I walked past the tree. It was a sign. So naturally I started thinking how can I make something delicious, but different at the same time with these pears? I've never made gnocchi before, so I decided to give it a try and honestly they turned out a lot better than I ever thought!  


Give this gnocchi with a fruity twist a try! I promise they wont disappoint! 

Ingredients:
4 medium to large potatoes (Russets or Idaho's work best)
1 1/2 cups of white unbleached flour
2 egg yolks
1 Tbs olive oil
about 1 cup of pear puree

Pear Puree:
2 large diced pears (leave one unpeeled and one peeled--the color of the peels looks great in the gnocchi and enhances the pear taste as well!)
1 Tbs of hot water
1/2 zest of a lemon

For the Sauté:
1/2 a shallot (chopped)
1/2 cup of wine
1 tsp apple cider vinegar
1 1/2 tsp salt
1 tsp pepper
1 tsp dried basil and parsley
1 Tbs fresh parsley

Puree: In a blender combine all the ingredients and puree until smooth!


Instructions for Gnocchi:


1.) Start with boiling the potatoes. When they are cooked and cooled, using a fork smash/mash the potatoes until they are as smooth as you can get them. Try to get all the lumps out! This is very important in having a good gnocchi dough.


2.) To the mashed potatoes, incorportate the 2 egg yolks. Then add the pear puree and stir until smooth.


 Then slowly, in thirds, add flour. The dough will be very mushy and lumpy at first; you need to kneed it until it can be formed into a large dough ball.


3.) Flour your work surface. Cut off a portion of the dough (maybe 1/6) and roll it into a log. The log should be about 1 inch wide! Using a sharp knife, cut off inch size pieces. Repeat until you end up with a lot of little gnocchi squares!


4.) Bring a large boiling pot to a boil (make sure to salt the water). Carefully drop in 10-12 gnocchi into boiling water and allow to cook for 2-3 minutes, or until the gnocchi float to the top. Keep a close eye on these! They cook quicker than you think! 

5.) Once the gnocchi float to the top, ladle them out into a large boil, and drizzle a little bit of olive oil over them so they don't stick to each other. Continue this process until all of your gnocchi are cooked!


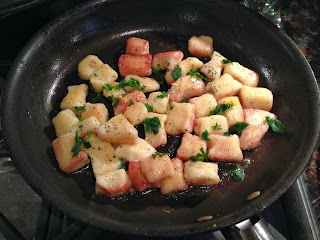
6.) In a large sauté pan, heat a Tbs of olive oil, stir in 1/2 a shallot (chopped) and cook until light brown. Add in about 10-12 gnocchi and allow them to get lightly brown on both sides (will take about 3-4 minutes per side). Once slightly brown, add red wine, apple cider vinegar, salt, pepper and herbs. Sauté for another 3 minutes or until wine is nicely reduced.


Serve immediately! They're the best when eaten straight out of the pan they were sautéed in! 

** You can also freeze the gnocchi after they are boiled and sauté them later on!
 My Dad and I ate 3 full plates of these! Can you say yummy! :) 


This one looked like a fish!

Happy Eating!

<3 Babushka

Thursday, September 19, 2013

Choco-Banana Smoothie!

Wait...regular college kids don't have blenders in their rooms? WHAT!

Hey fellow foodies! 

I havent posted a recipe in quite some time because I have been studying hard in college! I go to school in Milwaukee, Wisconsin studying Speech Pathology and Anthropology. I love going to school and learning, but Ive got to admit...I miss cooking!! I miss being able to invent new recipes and combine various flavors to satisfy my every craving. 

In college, I don't have access to a kitchen or delicious food, thus Im left with a long urge and craving to cook for weeks at a time. My solution? Bring a blender to school and try to make the best out of life. I get fruits, yogurts and veggies from the cafe and try to invent delicious and nutritious smoothies; college doesn't have the healthiest options for meals. 

So in an effort to be healthy while satisfying my food creativity, I made this delicious smoothie for lunch this afternoon! Its chocolaty in all the right ways :) 

Ingredients: 
1 banana
1 Tbs sunflower butter (or peanut butter)..., I like sunflower butter better :]
1/2 cup of chocolate almond milk
1 1/2 Tbs of greek yogurt 

Combine all the ingredients in a blender, blend until smooth and velvety and enjoy!!


<3 
Babushka

Monday, August 12, 2013

Veggie Pizza

This is my mom's and I pizza. We cook a lot together; although we bump heads in the kitchen sometimes...(she claims its her kitchen and I claim that it's mine). I love to cook with my mom and I've learned countless kitchen secrets from her that I will use of the rest of my life, as a young cook, mother/ wife, and old grandmother.
 
After the whole artichoke fiasco and struggles, we fell in love with the roasted jarred artichoke flavor and started to cook with it more often. This is one of the first pizzas we made using artichoke!
 
It is extremely easier to make because you just dump all the ingredients on there to be honest. Its a quick and easy dinner-- its also pretty healthy, considering all the veggies and calcium you're getting from the cheese!

Ingredients:

Store bought pizza dough
1 cup of tomato sauce (you could use my recipe :) )
1/2 cup of chopped roasted or pickled artichokes (from the jar is fine...that's what I used!)
1/3 cup chopped fennel 
1/4 cup chopped sun dried tomatoes
3 Tbs ricotta cheese
3 cloves of minced roasted garlic
1 large ball of sliced mozzarella
1 Portobello mushroom
1 Tbs olive oil
1 tsp salt


Assembly:
Preheat oven to 370 degrees
 
1.) Take the pizza dough, and on a floured surface, roll out the dough until about 1/2 inch thick and looks like a deformed circle.
2.) Cover a pizza pan with aluminum foil and drizzle with olive oil. Place pizza dough on the pan and form/stretch it so that it covers the surface of the circular pan.
3.) First, cover the pizza with a layer of tomato sauce, then add slices of mozzarella cheese all around. Add teaspoon sized dollops of ricotta cheese here and there as well, until the pizza is nicely covered with cheese.
4.) Next, top the pizza with fennel, sun dried tomatoes, mushrooms, artichokes and garlic. Drizzle with olive oil and bake in the oven for about 15-20 minutes-- until the edges of the crust is golden brown, cheese is melted and veggies are roasted.
5.) When you remove the pizza from the oven, sprinkle 1 tbs of salt on top. I also like to drizzle more olive oil on top as a finish. Adds yumminess also!
 
Cut into squares or triangle slices, I prefer triangle because it looks more traditional, is easier to eat and cut!
 
Eat up!!


Its even better the next day ;)

ENJOY
 
<3 Babushka