Sunday, December 29, 2013

Greek Style FIsh with Rice Balls


I love fish; my dad has been bringing home fresh catcher fish since I can remember. He would spend all weekend fishing in some forest way off in the nowhere, and come home with up to 40 fish! 

Having so much fish, Ive always been in charge of coming up with creative ways to cook, the fish; smoke it, shallow fry it, deep fry it, bake it. 
Being in love with Greek culture, this is my way of being creative and blending my passions together: various cultures and cooking. Hope you enjoy this one! 


Ingredients:

12-15 filets of fish

Fish Marinade:
1 cup of olive oil
1 Tbs Balsamic Vinegar
2 cloves of garlic
1 Tbs Basil pesto
1 tsp dried parsley
1 tsp dried oregano
1 tsp salt
1 tsp pepper

Rice Balls:
1 1/2 cups of brown rice
1 Tbs olive oil
2 cups of vegetable/chicken broth
1/4 cup of red wine
3 egg yolks
Salt and pepper to taste


Assembly:

Fish:
1. Mix all of the ingredients in a bowl. Transfer half of the mixture into one plastic bag and half into another.
2. Place half of the fish into one marinade and half in the other. Massage the fish in the plastic bag; this is to make sure that the marinade gets all over the fish. All to marinade for 4-8 hours.
3. Once marinade process is done. Heat the oven to 375 degrees. Place fish on a baking sheet drizzled with olive oil, and bake for 25-30 minutes.

Rice Balls:
1. Combine vegetable broth and wine in a medium pot. Bring to boil, add rice. Stir and bring back to boil, then reduce heat to a simmer. Allow rice to simmer for 10 minutes, stirring every 2 minutes. Once liquid is absorbed and rice is soft, add olive oil and take off heat. Incorporate egg yolks. When the rice mixture is cooled, roll rice into golf size balls (or larger). Put them on a oiled pan and bake at 350 for 20 minutes.
2. When they're finished, place the rice balls in a warm tomato sauce so that the rice absorbs delicious tomato flavors! 

Serve Greek style fish along side the rice balls covered in tomato sauce! 


The fish I used for this recipe is Perch… DELICIOUS! 

These rice balls aren't in tomato sauce; simply drop them in a saucepan with warm tomato sauce!

ENJOY! 


Friday, December 20, 2013

Rosemary Orange Chicken


My favorite colder, winter time meal is roasted chicken. Its the perfect hardy dinner that one needs after a snowy and bitter afternoon. The smell of apples, oranges and rosemary combined with crispy chicken is almost divine. For me, theres no better meal to cook for my family in December. 


Ingredients:
1 whole chicken
1large potato
1 medium apple
1/4 cup of celery
2 oranges
2 sprigs of fresh rosemary
1 basil leaf
2 Tbs salt
1 tsp pepper
1 tsp dried parley
3 Tbs olive oil

Assembly:
1. Preheat oven to 400 degrees

2. Make sure your chicken is thawed if it is frozen. Take the chicken and place on a clean cutting board (make sure you have an apron on and have washed your hands with soap and water). Drizzle olive oil all over the chicken and use your hands to massage it all over the chicken. Wash your hands again.

3. Sprinkle half of the salt, pepper, dried parsley and rosemary over the chicken, and massage it in. Wash your hands again.

4. In a large bowl, place the peeled and diced potato and apple. Cut the orange into fourths and then again each fourth in half. Add the celery and sprinkle in the rest of the salt, pepper, herbs and chopped basil. Take the other orange and squeeze all of the juice out over the mixture.

5. Transfer chicken into a roasting pan. Place half of the potato and apple mixture inside the cavity and half around the chicken.

6. Bake for 30-40 minutes, depending on how large the chicken is. You will know the chicken is done when the skin is brown and crispy and then the meat is fork tender. 

(Unfortunately I didnt take a  picture of this meal) 

You may choose to baste the chicken every 10 minutes or so with the drippings in the pan. This will help the chicken in absorbing the juices from the fruit and veggies, and get the skin crispy. 


STAY WARM! 


ENJOY! 

Saturday, October 12, 2013

Homemade Pumpkin Puree

Ever since I learned how easy it is to make your own pumpkin puree, I never buy the canned stuff! Fresh pumpkin puree, made by yourself tastes so much better in food than canned ever did! 


Ingredients:

1 pumpkin (size of your choice)
2 Tbs olive oil

Assembly:

1.) Preheat oven to 425 degrees F

2.) Thoroughly wash your pumpkin. With a sharp knife and sturdy cutting board, cut the pumpkin in half, and using a spoon, scoop all the seeds out from the inside. (If you want to make pumpkin seeds for a snack, save the seeds in a small bowl and bake them for 25 minutes with salt and pepper at 375 degrees!)

3.) Then depending on how big your pumpkin is, you'll need to cut each half in half or into fourths.

4.) Drizzle a baking sheet with olive oil and place the pumpkin pieces flesh side up.

5.) Bake the pumpkin for 45 minutes, or until fork tender. Sometimes a pumpkin will need to be baked more, especially if it is larger. If this is the case, just bake it until it is fork tender.

6.) Once pumpkin is cooked and cooled, place the pumpkin in a blender and blend until smooth.

7.) Transfer pumpkin puree into a large bowl. Use for anything from pumpkin soup, bread, smoothies, oatmeal and even pumpkin gnocchi! 

** This pumpkin puree will be a lighter shade of orange than canned pumpkin. This is because this pumpkin puree is fresh and have NO ADDED PRESERVATIVES! 

Have happy and healthy fall fun! 

<3 Babushka


Homemade Potato and Pear Gnocchi

We have a pear tree in my backyard. One morning I walked out and two pears dropped down right as I walked past the tree. It was a sign. So naturally I started thinking how can I make something delicious, but different at the same time with these pears? I've never made gnocchi before, so I decided to give it a try and honestly they turned out a lot better than I ever thought!  


Give this gnocchi with a fruity twist a try! I promise they wont disappoint! 

Ingredients:
4 medium to large potatoes (Russets or Idaho's work best)
1 1/2 cups of white unbleached flour
2 egg yolks
1 Tbs olive oil
about 1 cup of pear puree

Pear Puree:
2 large diced pears (leave one unpeeled and one peeled--the color of the peels looks great in the gnocchi and enhances the pear taste as well!)
1 Tbs of hot water
1/2 zest of a lemon

For the Sauté:
1/2 a shallot (chopped)
1/2 cup of wine
1 tsp apple cider vinegar
1 1/2 tsp salt
1 tsp pepper
1 tsp dried basil and parsley
1 Tbs fresh parsley

Puree: In a blender combine all the ingredients and puree until smooth!


Instructions for Gnocchi:


1.) Start with boiling the potatoes. When they are cooked and cooled, using a fork smash/mash the potatoes until they are as smooth as you can get them. Try to get all the lumps out! This is very important in having a good gnocchi dough.


2.) To the mashed potatoes, incorportate the 2 egg yolks. Then add the pear puree and stir until smooth.


 Then slowly, in thirds, add flour. The dough will be very mushy and lumpy at first; you need to kneed it until it can be formed into a large dough ball.


3.) Flour your work surface. Cut off a portion of the dough (maybe 1/6) and roll it into a log. The log should be about 1 inch wide! Using a sharp knife, cut off inch size pieces. Repeat until you end up with a lot of little gnocchi squares!


4.) Bring a large boiling pot to a boil (make sure to salt the water). Carefully drop in 10-12 gnocchi into boiling water and allow to cook for 2-3 minutes, or until the gnocchi float to the top. Keep a close eye on these! They cook quicker than you think! 

5.) Once the gnocchi float to the top, ladle them out into a large boil, and drizzle a little bit of olive oil over them so they don't stick to each other. Continue this process until all of your gnocchi are cooked!


6.) In a large sauté pan, heat a Tbs of olive oil, stir in 1/2 a shallot (chopped) and cook until light brown. Add in about 10-12 gnocchi and allow them to get lightly brown on both sides (will take about 3-4 minutes per side). Once slightly brown, add red wine, apple cider vinegar, salt, pepper and herbs. Sauté for another 3 minutes or until wine is nicely reduced.


Serve immediately! They're the best when eaten straight out of the pan they were sautéed in! 

** You can also freeze the gnocchi after they are boiled and sauté them later on!
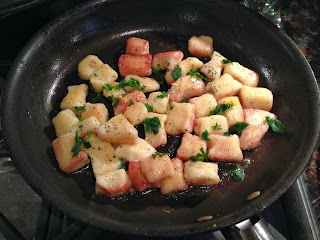
 My Dad and I ate 3 full plates of these! Can you say yummy! :) 


This one looked like a fish!

Happy Eating!

<3 Babushka

Thursday, September 19, 2013

Choco-Banana Smoothie!

Wait...regular college kids don't have blenders in their rooms? WHAT!

Hey fellow foodies! 

I havent posted a recipe in quite some time because I have been studying hard in college! I go to school in Milwaukee, Wisconsin studying Speech Pathology and Anthropology. I love going to school and learning, but Ive got to admit...I miss cooking!! I miss being able to invent new recipes and combine various flavors to satisfy my every craving. 

In college, I don't have access to a kitchen or delicious food, thus Im left with a long urge and craving to cook for weeks at a time. My solution? Bring a blender to school and try to make the best out of life. I get fruits, yogurts and veggies from the cafe and try to invent delicious and nutritious smoothies; college doesn't have the healthiest options for meals. 

So in an effort to be healthy while satisfying my food creativity, I made this delicious smoothie for lunch this afternoon! Its chocolaty in all the right ways :) 

Ingredients: 
1 banana
1 Tbs sunflower butter (or peanut butter)..., I like sunflower butter better :]
1/2 cup of chocolate almond milk
1 1/2 Tbs of greek yogurt 

Combine all the ingredients in a blender, blend until smooth and velvety and enjoy!!


<3 
Babushka

Monday, August 12, 2013

Veggie Pizza

This is my mom's and I pizza. We cook a lot together; although we bump heads in the kitchen sometimes...(she claims its her kitchen and I claim that it's mine). I love to cook with my mom and I've learned countless kitchen secrets from her that I will use of the rest of my life, as a young cook, mother/ wife, and old grandmother.
 
After the whole artichoke fiasco and struggles, we fell in love with the roasted jarred artichoke flavor and started to cook with it more often. This is one of the first pizzas we made using artichoke!
 
It is extremely easier to make because you just dump all the ingredients on there to be honest. Its a quick and easy dinner-- its also pretty healthy, considering all the veggies and calcium you're getting from the cheese!

Ingredients:

Store bought pizza dough
1 cup of tomato sauce (you could use my recipe :) )
1/2 cup of chopped roasted or pickled artichokes (from the jar is fine...that's what I used!)
1/3 cup chopped fennel 
1/4 cup chopped sun dried tomatoes
3 Tbs ricotta cheese
3 cloves of minced roasted garlic
1 large ball of sliced mozzarella
1 Portobello mushroom
1 Tbs olive oil
1 tsp salt


Assembly:
Preheat oven to 370 degrees
 
1.) Take the pizza dough, and on a floured surface, roll out the dough until about 1/2 inch thick and looks like a deformed circle.
2.) Cover a pizza pan with aluminum foil and drizzle with olive oil. Place pizza dough on the pan and form/stretch it so that it covers the surface of the circular pan.
3.) First, cover the pizza with a layer of tomato sauce, then add slices of mozzarella cheese all around. Add teaspoon sized dollops of ricotta cheese here and there as well, until the pizza is nicely covered with cheese.
4.) Next, top the pizza with fennel, sun dried tomatoes, mushrooms, artichokes and garlic. Drizzle with olive oil and bake in the oven for about 15-20 minutes-- until the edges of the crust is golden brown, cheese is melted and veggies are roasted.
5.) When you remove the pizza from the oven, sprinkle 1 tbs of salt on top. I also like to drizzle more olive oil on top as a finish. Adds yumminess also!
 
Cut into squares or triangle slices, I prefer triangle because it looks more traditional, is easier to eat and cut!
 
Eat up!!


Its even better the next day ;)

ENJOY
 
<3 Babushka

Sunday, August 11, 2013

Polish style Jambalaya!


I have always wanted to cook jambalaya! I don't know what it is about this dish but it just sounds fun!

So...I decided to go for it and cook jambalaya! Now, I'm not sure if this dish can actually be called jambalaya because I've never seen it be cooked or tasted it before making this dish. So call it what you will, I'm calling it jambalaya because it tasted hella great and sure looked like jambalaya from the Google search I did afterwards! :)
 
My dads exact words, "You got another pot of that stuff? NO?!... Better get started on the next pot then".
 
Ah,, you can always count on daddy to make you feel confident about your cooking :) If my dad approves, then this dish is golden...(he's always been a picky eater)

Now all I've got to do is take this recipe down to New Orleans and get their approval!
 
p.s.. this is "Polish Style Jambalaya because I used smoke Polish sausage!

Ingredients:

5 links of smoked Polish sausages, cubed
20 shrimp ( you may leave them whole with the tail, whole without the tail or cubed them, whatever you prefer. I just removed the tail and cut them in half)
1 1/2 cups of cooked rice
3 cups of chicken stock
2 Tbs tomato paste
1 diced sweet potato
1 diced red pepper
1 diced onion
2 cloves of minced garlic
1 cup of white wine
1 Tbs balsamic vinegar
1 tsp apple cider vinegar
1 tsp dried basil
1 tsp dried parsley
1 tsp red pepper flakes (add more if you prefer spiciness)
2 Tbs fresh parsley
2 Tbs green onions
2 Tbs fresh chives
3 Tbs olive oil
salt and pepper to taste


Assembly:

1.) Preheat oven to 375 degrees.
2.)  In a medium pot, bring 2 cups of water to a boil, add in rice and cook for about 15-20 minutes, or until fluffy. Add in 1 Tbs olive oil when rice is finished cooking.
3.) In a large pot, heat oil and add in 2 cloves of garlic. Once golden brown, add in diced onion. Cook until caramelized. Add a pinch of salt and pepper
4.) Put the diced sweet potato on a baking sheet with olive oil and bake in the oven for 25 minutes. Check up on them after 15 minutes, and stir them around so they don't stick to the baking sheet.
5.) Meanwhile, add cubed sausage into garlic and onions. Stir and allow sausage to brown.
6.) Add wine and both vinegars to the sausage, as well as the tomato paste, reduce heat and allow for the wine to reduce a little bit, about 5-7 minutes. Pinch of salt and pepper.
7.) Add in chicken stock, bring to boil and reduce to a simmer. Add in uncooked shrimp to the broth, along with the fresh and dried herbs.
8.) Allow to simmer for 5 minutes, so the shrimp cook. Add in sweet potato while shrimps are cooking and after 5 minutes of the shrimp being in the broth, turn off the heat. Add cooked rice into broth and stir.
9.) Taste the broth. If not seasoned enough, add the appropriate amount of salt and pepper.

Serve right away!


ENJOY

<3 Babushka


Rustic Roasted Veggie Spaghetti


This spaghetti recipe came about because my mom bought artichokes and had no idea what they were. I've never actually cooked with them, but I've watched them be cooked on Food Network countless times, so I thought: No problem.

Let me just tell you....problem.

Artichokes are extremely hard to cook and are sure stubborn vegetables! No matter how long I cooked that artichoke, the leaves were tough, chewy and not edible at all. The only part that was edible (the artichoke heart) is TINY and I felt like I was wasting good vegetable.
 
Don't beat yourself up if you cant cook artichokes either...There is a reason why the word "choke" is in there: if you try to mess with it... (that was me trying to joke lol)
 
So I decided to give myself a break because I wasn't going to be able to cook the damn thing anyway, so I bought pickled artichokes in a very cute glass jar and used them in this spaghetti dinner.
Turned out delicious and very fulfilling! Especially since I didn't have to image myself banging my head against the counter top while cooking this time around with the artichokes!

This spaghetti dish is super yummy, filled with nutritious veggies and is perfect for any season or occasion!


Ingredients:

1/2 box of spaghetti
3 large pickled artichoke hearts (roughly chopped)
2 large carrots (peeled into strips with a potato peeler)
1 onion (diced)
1 parsnip (cubed)
1 cup of wine
1 tsp apple cider vinegar
1 1/2 tsp balsamic vinegar
1/2 cup chopped fresh parsley
1/2 cup of chopped green onions
1/2 cup of chopped fresh cilantro
1 Tbs of dried herbs (parley, oregano, basil, cilantro and thyme)
2 Tbs of tomato paste
1/2 Tbs of red pepper flakes
3 Tbs olive oil
salt and pepper to taste

Assembly:

1.) Bring 2-3 cups of water to a boil, and drop in spaghetti. Cook until al dente.
2.) Peel carrots with a potato peeler into medium sized strips. Set aside in a bowl.
3.) In a large pan, heat olive oil, add in diced onion and cook until golden brown. Add diced parsnip. Cook until fork tender, or brown.
4.)  Reduce heat and slowly add wine. Bring to simmer and allow most of the alcohol to cook off. Add in balsamic, apple cider vinegar and tomato paste. Allow sauce to simmer and reduce. Add in 1/2 cup of water or chicken stock, stir and remove from heat and add in chopped artichoke hearts into sauce.
5.) Incorporate spaghetti into the sauce. Add in the fresh and dried herbs, as well as salt, pepper and red pepper flakes.
6.) Drizzle 1 Tbs of olive oil on top. May be served hot right away, served cold, or made in advance and served at a later time.


ENJOY

<3 Babushka


Tuesday, August 6, 2013

Homemade Tomato Sauce

Easy and quick to make, tomato sauce!

Yield: about 1 1/2- 2 cups of sauce

Ingredients:
5 large Roma tomatoes (you could use other kinds if you'd like)
1 cup of water
1/2 cup of fresh chopped basil
1 tsp balsamic vinegar
1/2 tsp dried parsley
1 Tbs olive oil
salt and pepper to taste

Assembly:
1.) In a sauce pan, or Dutch oven like I used, heat oil until hot, add diced tomatoes. Bring to a boil, then lower heat and let them simmer for about 10 minutes.
2.) Add chopped basil, balsamic vinegar, parsley, salt and pepper. Stir, then add water and continue to cook for 5 minutes.
4.) Turn off heat, and taste. Add more salt and pepper if needed.
5.) Take the sauce and carefully pour it into a blender, and pulse until smooth. ( I leave mine a little chunkier!)
 
Great on pizza, pasta, Mexican dishes...etc!


ENJOY
<3 Babushka

Wednesday, July 31, 2013

Chocolate Pancakes

 
My mom and I had just finished eating dinner one night when she told me she was still hungry. This hardly ever happens...I turned to her and, in shock replied, "What do you want me to make you?"

I decided to make my mom chocolate pancakes as a post dinner snack lets call it. They took me less than 10 minutes to prepare, and I was all finished in under 20 minutes. I used the simplest ingredients: whatever I had in my fridge. Ultimately I could've made just plain old pancakes, but I saw the almost empty jar of Nutella in our cupboard, and I chose to add some hazelnut spice to my evening.
 
These pancakes are almost soft when you eat them, and the chocolate isn't overpowering at all; it gives the hint of chocolate to all the right taste buds.
If you're looking for a healthier chocolate option, follow my recipe! If you would like something sweeter, simply add either 1/2 cup of honey or granulated sugar to this recipe :)
 
Yields: around 6 pancakes
 
Ingredients:
1 cup of flour
1 egg
1 Tbs of olive oil
1/2 cup of Nutella
1/2 cup of cocoa powder
3 Tbs of vanilla yogurt
1/4 cup of milk (add more if the batter is not liquid-y enough)
1 1/2 tsp of baking soda
1 tsp salt
1 tsp nutmeg
 
Assembly:
 
1.) In a large bowl, mix together flour, baking soda, nutmeg, cocoa powder and salt.
2.) In a separate bowl, beat the egg and slowly drizzle in olive oil. Add yogurt, Nutella and milk. Whisk until all are combined.
3.) Slowly, add the dry ingredients to the wet ingredients in thirds. Mix until you have reached a smooth consistency (you might have to add a little more milk if the batter is dry).
4.) Heat oil in a large frying pan. When you see the oil start to lightly smoke, ladle in batter into pancakes of desired size. Let them cook until little bubbles appear on the surface of the pancake and until the edges appear brown. Flip the pancake and fry for another 3-5 minutes, or until golden brown.
 
Serve with maple syrup, honey, jam, preserves or yogurt. I made my moms with raspberry preserves, Greek yogurt, and topped them with fresh figs. You can add more Nutella, fruit or whatever you would like!


ENJOY
 
<3 Babushka


Tuesday, July 30, 2013

Autism Speaks!

Hello Everyone!
 
I mentioned earlier in my introduction that I am an intern at Autism Speaks for the summer of 2013. Although my internship is only for a short while, I have been an advocate of supporting people with disabilities my entire life, and plan on supporting Autism Speaks and their cause for a long time.
 
I am raising money for Autism Speaks; I ran 5k last weekend, and plan on running for Autism Speaks  every other race that I decide to run as well.
 
If you would like to donate, or know anyone who would like to please visit my donation page:
 
 Any amount is greatly appreciated and welcomed! Please spread the word about Autism Speaks and continue to be kind to one another.
 
Please visit the Autism Speaks website if you wish to find out more about our organization:
 
or email me with any questions:
 
Thank you for reading my blog, please post any comments or questions! :)


<3 Babushka

Friday, July 26, 2013

Polish Beet Pancakes

These Beet Pancakes are a twist on the traditional Polish placki ziemniaczane (potato pancakes)!
 
Potato pancakes are a staple food in Eastern Europe, and many Middle Eastern countries, such as Israel. I remember helping my mom and grandma make these when I was a little girl; I had the job of mixing :) I love making potato pancakes to this day, they're still one of my favorite foods, but trying to cook healthier foods, I came up with the idea to use beets instead! Beets are also a very common food, that is incorporated into many Polish dishes, so we always have a couple of beets stocked in our fridge.
 My family and I absolutely love these pancakes and they go faster than they fry!
Absolutely delicious :)

Ingredients:

Pancakes-
2 beets, peeled
1/2 diced onion
2 eggs
1/4 to 1/2 cup of flour
1 Tbs apple cider vinegar
1/2 tsp fennel seed
1 tsp died basil
1 tsp dried parsley
3 Tbs olive oil
salt and pepper to taste

Sauce-
1 cup of Greek yogurt
1/4 cup of chopped dill
1/2 a large cucumber, grated
1 tsp of lemon juice
1 tsp dried basil
1 tsp dried mint
1 tsp salt and pepper
1 tsp olive oil

Cooking time: 30 minutes

Assembly:

Beet Pancakes
1.) In a medium pot, bring about 5-6 cups of water to a boil. Add peeled beets, and let them boil until the surface of the beets is fork tender; you've cooked the beet too long if the entire beet is fork tender.
2.) Drain the beets and rinse them with cold water, until they are cooled off enough to handle. Grate the beets in a large bowl (make sure to include all the juices!)
3.) Add 1 Tbs of olive oil, and the remained of the ingredients to the grated beets and mix. You might have to add more flour depending on how much juices the beets release; you want to consistency of cake batter.
4.) Heat the rest of oil in a large pan. Once the oil has heated, form the beets into tennis ball size, add them to the pan, and press them down to make a flat pancake. (You can make the pancakes bigger or smaller).
5.) Fry them until golden an crispy on one side, flip and fry them until golden, about 4-5 minutes on each side. Transfer to a plate covered with paper towel to drain the excess oil.
 
** The pancakes are not going to be perfectly round, its okay if they come out a little deformed, mine always do!

Cucumber Sauce
1.) In a large bowl, combine all of the ingredients. Mix together and top beet pancakes!
 
Serve immediately! Best when hot!


** Everyone loves how bright red these turn out! Also, the red pancakes with the sauce on top resembles the Polish flag!! :)
 
ENJOY
<3 Babushka

Seafood Soup

 
This seafood soup is inspired by the Spanish dish called paella. I've always wanted to try it, and some day make a real, true Spanish paella dish; I hope one day I do get to make that dish but in the mean time, I've thought up this recipe! Its a quick, easy to make and hearty seafood soup/stew that really brings you to the shores of the ocean!
Don't be afraid of the fishy taste of fish, this soup definitely does not taste fishy-- I made sure that the broth has plenty of vegetable flavor that would compliment the fish and shrimp, not overpower it!
 
Perfect for a cooler summer day, rainy day or any day actually! My seafood soup will surely be a crowd pleaser!
 

Ingredients:

5 filets of cubed, bite size pieces of fish (any kind, I used tilapia)
15- 20 shrimp, cleaned and deveined (you can keep the tails of remove them)   
1 cup of rice
2 cups of water
2 cups of vegetable or fish stock
1/2 cup of wine
1 cup of chopped celery (chop up the tops of the celery leaves also)
1/2 cup of chopped parsnip
1/2 cup of onion
1 1/2 tsp apple cider vinegar
1 tsp balsamic vinegar
1/4 cup of tomato paste
1 tsp dried basil
1 tsp dried parsley
1/2 tsp dried oregano
1 tsp of dried mint
1/2 tsp of red pepper flakes
4 Tbs olive oil
salt and pepper to taste

Cooking time: About 1 hour

Assembly:
 
1.) Heat 2 Tbs of olive oil in a medium pot, add onions and cook until they appear translucent. Add celery (but not the leaves) and parsnip, add a dash of salt and cook for 15 minutes and stir constantly.
2.) Slowly, add 1/2 cup of wine to the vegetables, stir and scrap the bottom of the pan with a wooden spoon (there is a lot of flavor at the bottom from all of those caramelized veggies!) Bring wine to a boil, then reduce to a simmer and cook for 5 minutes.
3.) Add both apple, balsamic vinegar and vegetable stock to the pot. Stir in the tomato paste and when the soup starts to simmer, add herbs, red pepper flakes and 1 tbs of salt and pepper. Bring to a boil.
4.) When the soup starts to boil, first add in cubed fish and let cook for about 3-5 minutes, then add the shrimp (This is because shrimp cooks much faster than fish): there is no need to season the fish before because it will absorb all the flavor of the broth. Bring the soup to a boil, reduce to a simmer and cook for 8-10 minutes, or until seafood is tender and fully cooked.
5.) In a separate pot, cook rice until fluffy. Add 1 Tbs of olive oil, and 1/2 tbs of salt.
(I actually used bulgur wheat instead of rice when I cooked this because I didn't have rice at home. So feel free to substitute rice with another grain, like couscous, bulgur wheat or even buckwheat!)

To serve: In a bowl, add desired amount of rice and ladle in seafood soup on top of the rice. The grain will soak up all the juices and make for a heartier meal!


ENJOY
<3 Babushka

Monday, July 1, 2013

My favorite food: Farmers Cheese


Farmer's Cheese...many Americans don't know what it is, they simply walk past it at the grocery store not even glancing at it. Me however, I run to the dairy section of every store! It has always been in the fridge at my house; my mom mixes it with sour cream or Greek yogurt, scallions and diced radishes-- it becomes the consistency of ricotta cheese, whereas before it was a block like feta cheese. 

This is MY FAVORITE FOOD! I would eat it for breakfast, lunch and dinner, on a sandwich or by the spoonfuls! :)

Ingredients:
1 block of Farmers cheese--comes in a package usually says in Polish "Twarog" 
5 spoonfuls of Greek yogurt or sour cream--you can add more or less depending on how creamy you want it to be
3 diced radishes
3 diced green onions
salt and pepper to taste

Assembly:

1.) In a large bowl, break up or mash the farmers cheese. Add scallions, radishes and Greek yogurt. Add salt and pepper. Taste. If you feel like it needs more salt or pepper, add more. 

** This recipe, and most Polish recipes, are ones that require your judgement on how it looks or tastes. Therefore if you feel like the cheese tastes a little bland, go ahead and add more scallions and salt! You can play around a lot with this recipe to make it exactly how you like it. 

Tastes amazing on: Sandwiches with sliced tomatoes and cucumbers! :) Best breakfast or lunch ever known to exist to man--yet so extremely simple!


ENJOY :)

<3 Babushka

Bonkers for Banana Bread


I have always been a carbo-holic. Loving bread, pasta, crackers, potatoes, and other other kind of carbs out there! I love fruits even more; I used to eat 8 apples a day regularly. So put two and two together--this girl is in paradise! I used to make banana bread from recipes online, and just adding my little flairs here and there...now I'm at the point where I can fully make my own recipe (how exciting is that)!! 

Here is my prised banana bread recipe with my whole hearted love in every ingredient. It is everything I adore on its own but absolutely love when combined together and baked. Its not too sweet, but just the right amount; moist on the inside but glistening golden brown on the outside. 

Just as I tweeked the recipes I was using from the Internet before, you can also tweek this recipe to add ingredients that you love and adore :)


Ingredients:
4 bananas
1 1/2 cups of whole wheat flour (I like the nuttiness)
1/3 cup of oats
2 eggs
1 heaping Tbs of Greek yogurt
1/3 cup of honey
1 Tbs agave nectar
2 Tbs of olive oil 
2 caps of orange juice
1 Tbs of coconut oil 
1 tsp salt
2 tbs cinnamon
a pinch of ground ginger
1 tsp baking soda


Assembly:

1.) Preheat oven to 350 degrees. In a large bowl, mix together flour, baking soda, salt, ginger and cinnamon.  Set aside.
2.) In another bowl, mash together bananas until it become sort of a slurry. Beat in eggs, Greek yogurt, honey, agave nectar, orange juice, and olive oil. 
3.) Slowly, mix in the dry ingredients into the wet banana mixture. Best done in thirds. 
4.) If your coconut oil is solid in a jar like mine was, put it in a glass cup and microwave for about 30 seconds until it becomes a liquid. Then add oil and oats to the batter. 
5.) Get out a long 4X8 bread baking pan, cover it with oil (so banana bread doesn't stick) and spoon in batter. 
6.) Bake at 350 degrees Fahrenheit for 1 hour. When finished baking, let it rest for 10 minutes and indulge :)


**This banana bread is very moist! Dont think that it is under cooked--thats what my mom thought! It definitely is not...it is simply delicious! 

Not not mention--this recipe is much healthier than most banana breads, but a lot yummier! (And I've had my good share of banana bread in the past)

Ive added, nuts, chocolate chips, cranberries, raspberries and jam to this recipe before and it always tastes great! 


ENJOY!! :)

<3 Babushka


Friday, June 28, 2013

Shrimp Summer Pasta Salad


This is a quick and easy pasta salad that is great for the summer because it is served cold! Pack it up for a picnic, camping trip or serve it at a BBQ! It is definitely loaded with deliciousness and is very nutritious :) 

Get ready to WOW those taste buds!

Ingredients: 
1 cup of penne pasta (I like whole wheat because of the nuttiness)
8 cooked frozen shrimp (defrosted)
1 cup of shredded lettuce
1/2 cup of chopped beet greens
1 chopped scallion
1/2 cup chopped green onions
1/4 cup of goat cheese
1/2 cup of corn 
1/2 cup of chopped green olives
1 Tbs agave nectar
1/2 Tbs balsamic vinegar
1 Tbs dried Italian seasoning
salt and pepper to taste 

Assembly: 

1.) Set a pot filled with 2 cups of water over high heat on the stove top. Add 1 Tbs of salt and 1 Tbs of oil. Bring to boil, drop in pasta and cook for 8 minutes, constantly stirring until pasta is aldente. 
2.) Drain pasta and let it cool. While pasta is cooling, take cooked shrimp (I bought the ones that came already cooked frozen in the package), add balsamic vinegar, agave nectar, salt, pepper and dried 1/2 Tbs of Italian seasoning. Mix and set aside so that the flavors can grasp onto the shrimp.

3.) In a large mixing bowl, combine the rest of the ingredients. Add cooled pasta. Take the shrimp and cube them into bite sized pieces and add them as well. 
4.) Mix, and serve! Best served immediately because the ingredients are fresh :) 

** If you dont have beet greens on hand (I did because my mom and I were making beet soup the previous day and have the greens left over), you can use another green--for example kale or collard greens. If you use something else, make sure you cook it accordingly before adding it to the salad! This might mean you have to boil them in water or stock so that they're not tough. 


- Note: my pasta and shrimp turned a pretty purple color. That is because of the beet greens! 

ENJOY MY FRIENDS!

<3 Babushka

Thursday, June 27, 2013

My omelets bring all the boys to the yard

Ladies, 

this is your basic omelet recipe that will have any man you make it for, praising you for skills. 
"The way to a man's heart is through his stomach" is exactly right :) 

Even though I didn't make it for my significant other, I made it for my dad, if daddy approves...of course other men will also! 

Boys--you can also make this omelet for yourselves, this recipe is just exclusively for the ladies!

Ingredients:  
5 eggs
Splash of milk, or 1 Tbs if you are precise
1 tsp of dried Italian herbs (basil, parsley and thyme)
1 tsp of salt and pepper
Olive oil 

Assembly: 

1.) Crack eggs in a mixing bowl and whisk together, add the rest of the ingredients and whisk. 
2.) Heat a medium frying pan, coating the surface of the pan with olive oil.
3.) When the pan is hot, pour the mixture into the center and tilt the pan, making sure it covers the entire surface. 
4.) Slowly using a spatula, stir vigorously for 5 seconds. As soon as a semi-solid mass begins to form, tilt the pan and move it around until the the rest of the uncooked egg covers it. 
5.) Let the mixture cook for 20 seconds. This is the time you would add any extra ingredients and deliciousness to your omelet. I added mozzarella cheese and ham for my dad. 

What you put inside your omelet is completely up to you. I like goat cheese, arugula, corn and avocado! 

6.) Once you've added your ingredients, or until about 20 seconds have passed, fold over half of the omelet using your spatula, slide the omelet off the pan and onto a plate! Add any remainder ingredients that you might like (extra cheese, herbs, etc..) and serve right away!! 

**By the way-- this is a pretty huge omelet! Just a caution so that youre not shocked when you end up with a omelet that wont fit on your plate :) 

Don't be discouraged if your omelet doesn't turn out perfectly at first! It takes a while to master the art of making a pretty looking omelet...it took me several Sunday breakfasts to really get the hang of it.
It's worth the practice and patience! 


ENJOY MY FRIENDS!
<3 Babushka